This post is an adaptation of the original article “How to install and configure Django on a Linux shared hosting account” from a2hosting with the following changes:
1. ‘myapp’ changed to ‘mysite’ to make the text more usable with the original django tutorials (where ‘mysite’ is used throughout the text);
2. Added the Prerequisites section;
3. Versions of python and django changed to reflect the current stable versions at the time of writing of this post:
python 3.6.8 ==> 3.8.x,
django 2.1.8 ==> 3.1
4. Added a short section explaining how to uninstall the django app.
Table of Contents
Step 0: Prerequisites
Step 1: Create a Python application in cPanel
Step 2: Configure the Django project (in the shell)
Step 3 [optional]: Uninstall the Django project (if necessary or want to start over)
Step 0: Prerequisites
In order to complete this tutorial you will need a Linux hosting account with access to a standard cPanel interface as well as a shell access (usually provided via SSH). Also your host must have python enabled for your hosting account.
Step 1: Create a Python application in cPanel
The first step is to create a Python application within cPanel that will host the Django project. To do this, follow these steps:
-
Log in to cPanel.
-
Find the Setup Python App icon (usually in the SOFTWARE section) and double click it to start the setup script:
-
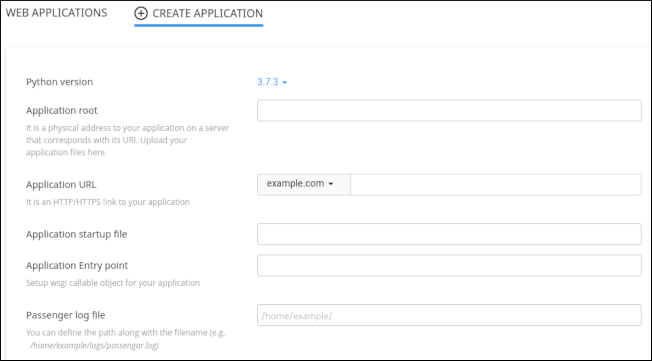
Click CREATE APPLICATION:

The application form appears:
-
In the Python version list box, select 3.8.3 (or some other 3.8.x version)
-
In the Application root text box, type mysite.
-
In the Application URL list box, select the domain. (Should be one of your unassigned/unused domains!) Leave the rest of the URL blank.
-
Leave the Application startup file text box and Application Entry point text box blank.
NOTE: When these text boxes are blank, cPanel automatically creates a passenger_wsgi.py startup file and default application object for you.
-
In the Passenger log file text box, you can optionally specify a log file for the application.
-
In the top right corner of the page, click CREATE:

cPanel creates the application and sets up the Python environment.
-
At the top of the page, note the message Enter to the virtual environment. To enter to virtual environment, run the command:. Below it is the actuall command. Copy the command. You will needit in the following step.
Step 2: Configure the Django project
After you create the Python application in cPanel, you are ready to do the following tasks at the command line:
-
Install Django.
-
Create and configure the Django project.
-
Configure Passenger to work with the Django project.
To do this, follow these steps:
-
Log in to your account using SSH.
-
Activate the virtual environment, using the command you noted in step 10 above. For example:
source /home/username/virtualenv/mysite/3.6/bin/activate && cd /home/username/mysite
The command prompt now starts with (mysite:3.6) to indicate that you are working in the mysite virtual environment with Python 3.6. All of the following commands in this article assume that you are working in the Python virtual environment. If you log out of your SSH session (or deactivate the virtual environment by using the deactivate command), make sure you reactivate the virtual environment before following any of the steps below.
-
To install Django, type the following commands:
cd ~
pip install django==2.1.8
To verify the version of Django that is installed, type the following command:
django-admin --version
-
To create a Django project, type the following command:
django-admin startproject mysite ~/mysite
-
To create directories for the static project files, type the following commands:
mkdir -p ~/mysite/templates/static_pages
mkdir ~/mysite/static_files
mkdir ~/mysite/static_media
-
Use a text editor to open the ~/mysite/mysite/settings.py file, and then make the following changes:
-
Locate the ALLOWED_HOSTS line, and then modify it as follows. Replace example.com with your own domain name:
ALLOWED_HOSTS = [
	'example.com',
	'www.example.com'
]
-
Locate the TEMPLATES block, and then modify it as follows:
TEMPLATES = [ { 'BACKEND': 'django.template.backends.django.DjangoTemplates', 'DIRS': [os.path.join(BASE_DIR,'templates')], 'APP_DIRS': True, 'OPTIONS': { 'context_processors': [ 'django.template.context_processors.debug', 'django.template.context_processors.request', 'django.contrib.auth.context_processors.auth', 'django.contrib.messages.context_processors.messages', ], }, }, ] -
Locate the STATIC_URL line, and then add the following lines beneath it:
STATIC_URL = '/static/'
STATIC_ROOT = os.path.join(BASE_DIR, 'static_files')

MEDIA_URL = '/media/'
MEDIA_ROOT = os.path.join(BASE_DIR, "static_media")
-
-
Use a text editor to open the ~/mysite/mysite/urls.py file. Delete all of the existing text, and then copy the following text into the file:
from django.contrib import admin from django.urls import path, include from django.conf import settings from django.conf.urls.static import static from django.conf.urls import url from django.views.generic.base import TemplateView urlpatterns = [ path('admin/', admin.site.urls), url(r'^$', TemplateView.as_view(template_name='static_pages/index.html'), name='home'), ] + static(settings.MEDIA_URL, document_root=settings.MEDIA_ROOT) urlpatterns += static(settings.STATIC_URL, document_root=settings.STATIC_ROOT) -
Use a text editor to open the ~/mysite/passenger_wsgi.py file, and then make the following changes. Replace username with your own account username:
import mysite.wsgi SCRIPT_NAME = '/home/username/mysite' class PassengerPathInfoFix(object): """ Sets PATH_INFO from REQUEST_URI because Passenger doesn't provide it. """ def __init__(self, app): self.app = app def __call__(self, environ, start_response): from urllib.parse import unquote environ['SCRIPT_NAME'] = SCRIPT_NAME request_uri = unquote(environ['REQUEST_URI']) script_name = unquote(environ.get('SCRIPT_NAME', '')) offset = request_uri.startswith(script_name) and len(environ['SCRIPT_NAME']) or 0 environ['PATH_INFO'] = request_uri[offset:].split('?', 1)[0] return self.app(environ, start_response) application = mysite.wsgi.application application = PassengerPathInfoFix(application) -
Use a text editor to create a basic index.html file in the ~/mysite/templates/static_pages directory. The file can be as simple as a text file that says Hello world.
-
Type the following command:
python ~/mysite/manage.py migrate
-
Set up the superuser account:
-
Type the following command:
python ~/mysite/manage.py createsuperuser
-
At the Username prompt, type the administrator username, and then press Enter.
-
At the Email address prompt, type the administrator e-mail address, and then press Enter.
-
At the Password prompt, type the administrator password, and then press Enter.
-
-
Type the following command to collect the static files:
python ~/mysite/manage.py collectstatic
If you are asked if you want to overwrite existing files, type yes and then press Enter.
-
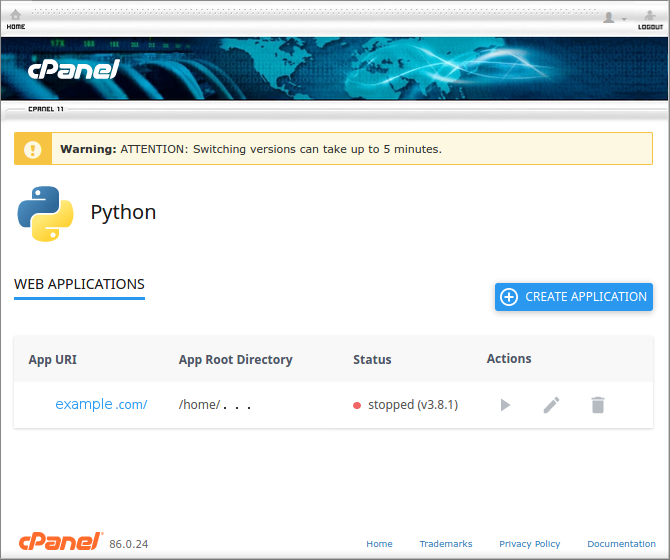
In cPanel, restart the Python application:
-
In the SOFTWARE section of the cPanel home screen, click Setup Python App.
-
Under WEB APPLICATIONS, locate the mysite application, and then click the Restart icon.
-
-
Test the Django site:
-
Use your browser to go to http://www.example.com, where example.com represents your domain name. The index.html file should load.
-
Use your browser to go to http://www.example.com/admin, where example.com represents your domain name. You should see the Django administration login page. To log in, use the superuser credentials that you created earlier.
If the web site does not appear in your browser, try running the passenger_wsgi.py file manually. To do this, type the following command:
python ~/mysite/passenger_wsgi.py
There should not be any text output to the console when you run this file. If there are any errors, check the syntax in the configuration files.
-
Step 3: Uninstalling the app
The installation process creates the following directories:
~/mysite
~/virtualenv/mysite
To uninstall the app you will need to:
– stop and then delete the python app in cPanel (see picture below).
This will take care of the folders and files inside the virtualenv directory.
After that you can manually delete the ~/mysite directory (unless you want to keep all the app’s files).
Further reading…
That’s it. You’re all set. Go read the django tutorial and code away…