It may sound like a dumb question, since X-CD-Roast is a GUI tool for writing files and images, but it’s logic is so user-unfriendly and unnatural that in reality it’s not at all simple to create a CD or DVD from ISO using this app.
Ok, so how do you write an ISO image with XCDRoast?
1. If possible start XCDRoast as root. Not that it doesn’t have a “user” mode, but… just run it as root if possible and save yourself some of the hassle.
2. On the first screen click the Setup button, then the “HD Settings” tab and add the directory where your INPUT ISO is to the list of Temporary Storage Directories. YES, I know, it is DUMB – they should have provided a separate location for input ISOs or a way of browsing and interactively selecting the source ISO file at time of burning but that’s how it works.
3. Click OK – this will bring you back to the Main GUI.
4. Click on Create CD/DVD (not on Duplicate CD/DVD). This is yet another dumb decision, since most normal people would associate burning a CD or DVD based on an image file with “duplicating” the source disk…
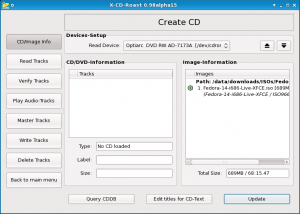
5. After clicking on Create CD/DVD your main cdroast window should look like this:

Your ISO file should appear in the right list-box (Image-Information).
6. Click on Write Tracks. Your ISO file should still be present in the left listbox. Select it and click the Add button. This should make the ISO file appear also in the left listbox and become greyed-out in the right box. This means that XCDRoast now knows that you want to write the CD as an Image and it is a tricky part as if you don’t do this it will simply copy the ISO to the DVD and instead of having a copy of the source ISO you will have a CD or DVD with the contents – the ISO file in the main directory.
7. Click the big “Accept track layout” button at the bottom. This will switch the tab from Layout tracks to “Write tracks”.
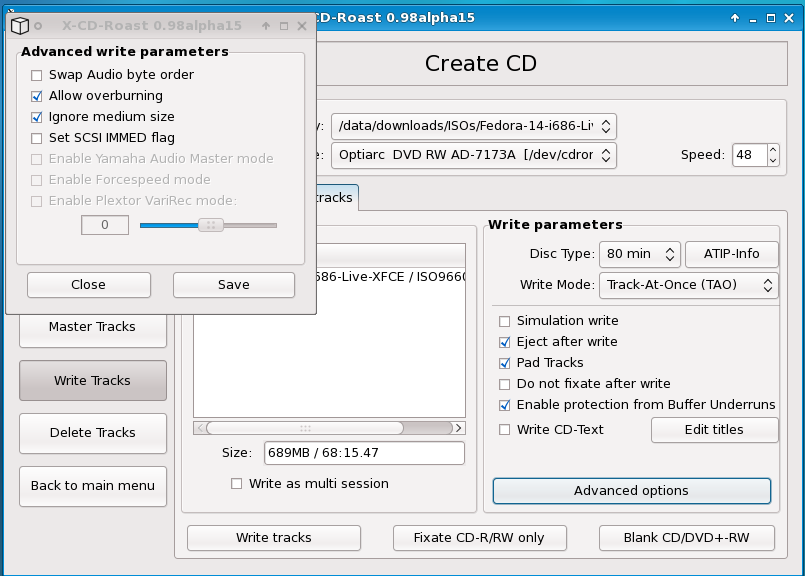
8. In the Write parameters section of XCDRoast make sure you’ve selected the correct medium params, matching your blank. I also recommend in Write Mode select “Track-At-Once (TAO)” – for some reason the DAO mode destroys my blanks. TAO works fine every time. Below I have given the settings I use (including the Advanced options).
That’s it. Easy, huh? 😉

.. or better yet get xfburn – much easier to use! 🙂